
Some things we’ve learned developing a 3D game for Lisp.
Hi, Mauricio Here,
This blog post is kind of a developers blog, as I said in my only previous post I’ve been dealing with the MS Windows side of things, I also made some 3D models using Blender, and use the abstractions Scott had created to create a a new scene for the game (a bedroom), but of course my job has not been limited to that. We’ve learned some stuff that we would like to share, so that is what I am doing.
Classimp on Windows.
One of the earlier lessons we learned was related to Assimp, for one thing downloading the binaries and moving the dll to your project directory does not work, in recent Assimp versions the name of the dll isn’t even one of the names searched by Classimp, and renaming or making the code match the dll name does not do the trick. In order to make classimp work we had to compile with gcc instead of visual c, using mingw,, this produces a libassimp.dll which is what classimp looks for and that DLL works fine. The latest Assimp library supported by Classimp is 3.3.1, so if you want to compile it yourself download that version and then follow the instructions here.
When you compile with MingGW using the instructions in the link the DLL will be in the “assimp-3.3.1\build\tools\assimp_cmd” directory, and asides from that you get an assimp.exe executable that is very useful for asset conversion. Currently we are consuming fbx files, so when I created models in Blender I exported them as fbx files, and that caused problems in some cases, so we adopted a different workflow which so far guarantees a model that loads correctly in CEPL, we use assimp.exe in the command line to convert the .blend to .dae which is the extension for Collada, an open exchange format, and then use Autodesk FBX Converter to convert the .dae to .fbx. This workflow gives you better control over the way that the files are converted.
Why not reading the .blend files directly?, Well for one thing we had some pre-made assets and those were fbx, and we want to be uniform., another reason is that sometimes the file would not be read correctly by classimp, but assimp.exe tries several stuff and is able to export it, as long as you remove any lamps form the scene (I also remove the cameras for good measure). And a third reason, is that sometimes we want to pre-transform the vertices specially with several objects in the same file, and doing this during the export simplifies the code to read the file. So we do use this:
assimp export file.blend file.dae -ptv
In the command line, where -ptv stands for pre-transform vertices, and assimp guesses the output file format from the extension of the second file. Assimp does not export fbx , that is why we export to ,dae and then convert. Classimp can read .dae files correctly, but fbx files are smaller, and the difference in load time is negligible for our purposes, and as I said we want to keep uniformity.
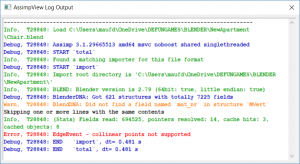
Another good tip is to use the assimp viewer to open an asset, and then look at the log file, this will warn you of possible problems when importing with classimp.
Multiple Textures in one Mesh.
We ran into a problem with a model of an avatar we were using in the game, the textures were not imported correctly, the head texture was applied to the body, so the model looked like it had no pants, and it had some weird things in the skin (actually stretched head features). The problem is that when you run (classimp:import-into-lisp) each mesh object contains only one texture. however the model had a mesh with two textures.
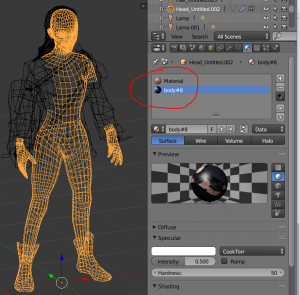
Luckily Blender allows you to select the portion of the mesh that is assigned to a particular texture and separate it. So we separated the head from the body, re exported, re-sorted the textures and voila, problem solved.
How do you know the order of the meshes? Well, the first thing is to name things right in Blender, then the structure you get when you import into lisp has a tree and that gives you the clue.
SPYCURSION-CLIENT> (ai:import-into-lisp (car *char8-data*))
#<CLASSIMP:SCENE {100A0E4AE3}>
SPYCURSION-CLIENT> (ai:root-node *)
#<CLASSIMP:NODE {1004FA9443}>
SPYCURSION-CLIENT> (ai:children *)
#(#<CLASSIMP:NODE {1004FA8663}> #<CLASSIMP:NODE {1004FA8903}>
  #<CLASSIMP:NODE {1004FA8B93}> #<CLASSIMP:NODE {1004FA8E33}>
  #<CLASSIMP:NODE {1004FA90D3}> #<CLASSIMP:NODE {1004FA9373}>)
SPYCURSION-CLIENT> (loop for x across * collect (ai:name x))
("Head" "Gadget" "Bag" "Body" "Jacket" "Hair")
SPYCURSION-CLIENT>
So the first mesh is the head, the second the Gadget, and so on. The pre existing textures worked well because I just separated and saved again so the UV coordinates remain intact, now each mesh reads from the right image, and maps the right coordinates.
Blender
One of the models I was making was a full room, to do it I used Archimesh, the room was simple, a rectangular room with a window and a door, and some cabinets, this worked out perfectly in Blender, but not so much when I imported the models in CEPL. The thing is that boolean operators produce weird geometry, and the holes in the walls for the door and window are produced by boolean subtraction. In other models the sub surface modifiers looked like crap when imported,
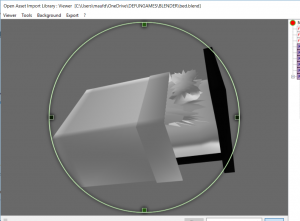
So I decided to re-make the room the old fashioned way, loop-cuts and face deletion, replace the old room, and apply all of the modifiers to other objects before exporting, that way the look was predictable.
The other thing I learned is that you need to either use the a processing flag in classimp or export the model with pre-transformed vertices, otherwise the objects in the scene were not placed in the right position. I used Blender to lay out the room furniture, and then exported each element separately, that made it easier to place and remove things, and handle the textures.
I also spend some time baking textures, and exporting the UVs, the UVs exported from Blender are immediately usable, and you can use DIRT to import the texture, so asides from the tedious process of UV wrapping the objects, assigning the image, and baking the textures into it, the process is very painless.
Final Thoughts
After ironing out the exporting problems saving models so they can be used with CEPL turns out to be a straight away process, there are some things in our code we are optimizing to make the process of maintaining the software and adding stuff more straight forward, but we have a working skeleton, we can create rooms and cities, place avatars, animate them, etc.
Of course there is still work to do, and Spycursion is curious in that it has two environments, the OS and the 3D world, but even when we some times hit ourselves against a wall, there is always a door a couple of steps away, as we learn more is like turning the lights on, we now where the walls doors, windows and other stuff is, and that allows us to move freely.
Our Kickstarter Launches February 26th!
We’re excited to remind you that our Kickstarter launches February 26th!
We’ll share the pre-launch page with you when we’re ready, but we’re looking for $100,000 to help us get Spycursion off the ground.
We’ve got some exciting backer rewards planned, so we hope you’re hyped!
For more information on our plans for Kickstarter, see here.
Check out our trailer if you haven’t already for an idea of what Spycursion is all about.
Don’t forget to follow our Twitter to keep up with what we’re up to!
What is Spycursion?
We’re glad you asked! Spycursion is our “edutainment” hacking MMO that aims to teach players how to hack and code. We want to get people more invested in the world of programming.
Spycursion may be educational in nature, but it’s as much a game as a learning tool. Expect more details on the MMORPG aspect of the game in the future!